EFTPOS NOW TERMINAL USER GUIDE
Introducing your EFTPOS Now terminal
Your EFTPOS Now terminal enables transactions to be processed for eftpos, Visa, Mastercard®and UnionPay cards as well as Charge Cards (American Express®and JCB).
It’s important to note that if you’d like to accept American Express, or JCB cards, you’ll need to enter separate agreements with them.
EFTPOS Now enables you to process:
- Purchases
- Purchases with Cash Out for Debit Cards
- Refunds
- Mail/Telephone Order (MOTO-approved merchants only)
- Cash Out transactions for Debit Cards
- Purchases with Tip
- Pre-Authorisation and Completion transactions, including an extended range of transactions offered by Visa, Mastercard and UnionPay (approved merchants only)
- Purchases using Split Billing
- Purchases using LitePOS.
American Express® is a registered trademark of American Express Company. Visa is a registered trademark of Visa International Service Association. Mastercard® is a registered trademark of Mastercard International Incorporated.
UnionPay is a trademark of UnionPay International Co. Ltd.
Any hardware or equipment and any unused stationery and promotional materials supplied by Westpac Banking Corporation (the Bank), remain the property of the Bank.
In addition:
- You must not sell, assign or in any way compromise them
- You can’t give them to a third party or give access to a third party
- You must make sure that the terminals are covered by your business or contents insurance
- Terminals must not be relocated without prior authorisation
- Terminals must be located where cardholders can use the touch screen without the risk of other people seeing them key in their PIN (Personal Identification Number).
If your merchant facility is cancelled for any reason, you must return the equipment and materials to us. You must return all equipment and materials within five business days of our request. If equipment and materials are not returned to us, charges will apply in line with ‘Your guide to merchant fees and charges’ available at westpac.com.au/merchant-terms.
To organise the return, call our Merchant Helpdesk:
1800 029 749 (available 24/7).
If the equipment is damaged, lost or stolen, you’ll be charged for its replacement.
You need to retain all printed merchant receipts in a secure manner for reconciliation and instances of terminal failure. Refer to the Merchant Business Solution Card Acceptance by Business Terms and Conditions (PDF 715KB) for more information.
You must provide cardholders with a receipt unless they request otherwise.
EFTPOS Stationary
Stationery can be ordered by phone or online. Orders are normally delivered within five business days, so it’s important to place your orders before running your stocks too low.
Ordering stationery online.
Log on to westpac.com.au/merchant-stationery
and click on the ‘Order now’ button, which will direct you to the stationery order page. Enter the following details:
- Merchant Number (MID)
- Trading Address Postcode
- Then select your stationery items and quantities and follow the prompts.
Ordering stationery by phone.
Call the Merchant Helpdesk on 1800 029 749 (available 24/7).
Follow the prompts and use your phone keypad to enter the following details:
- your stationery items and quantities; followed by
- your Merchant Number (MID); and
- your Trading Address Postcode.
Getting started
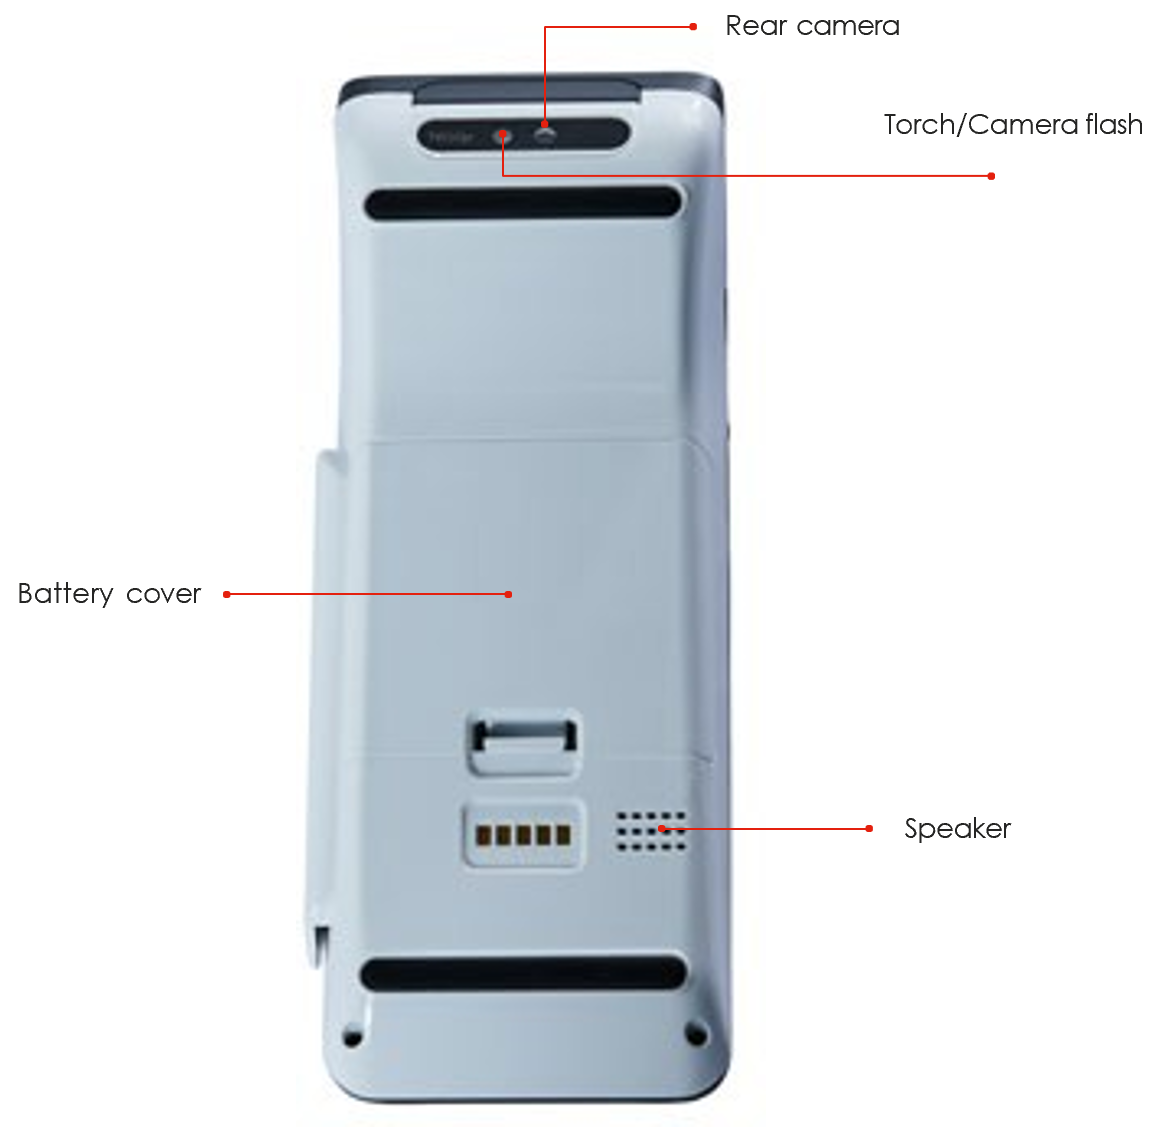
Get to know your terminal and its features
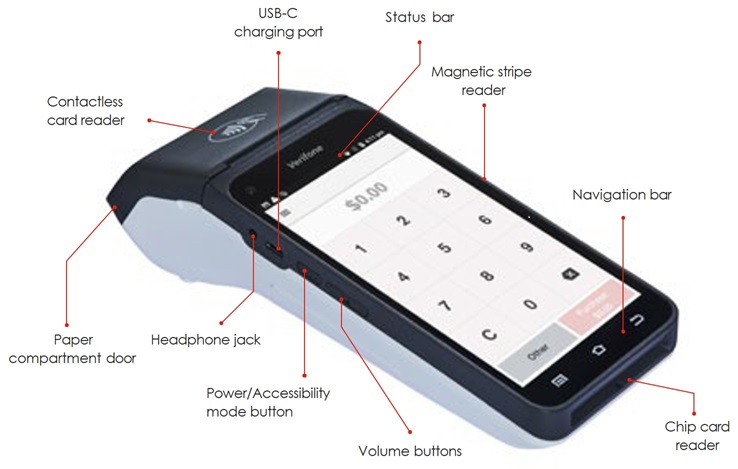

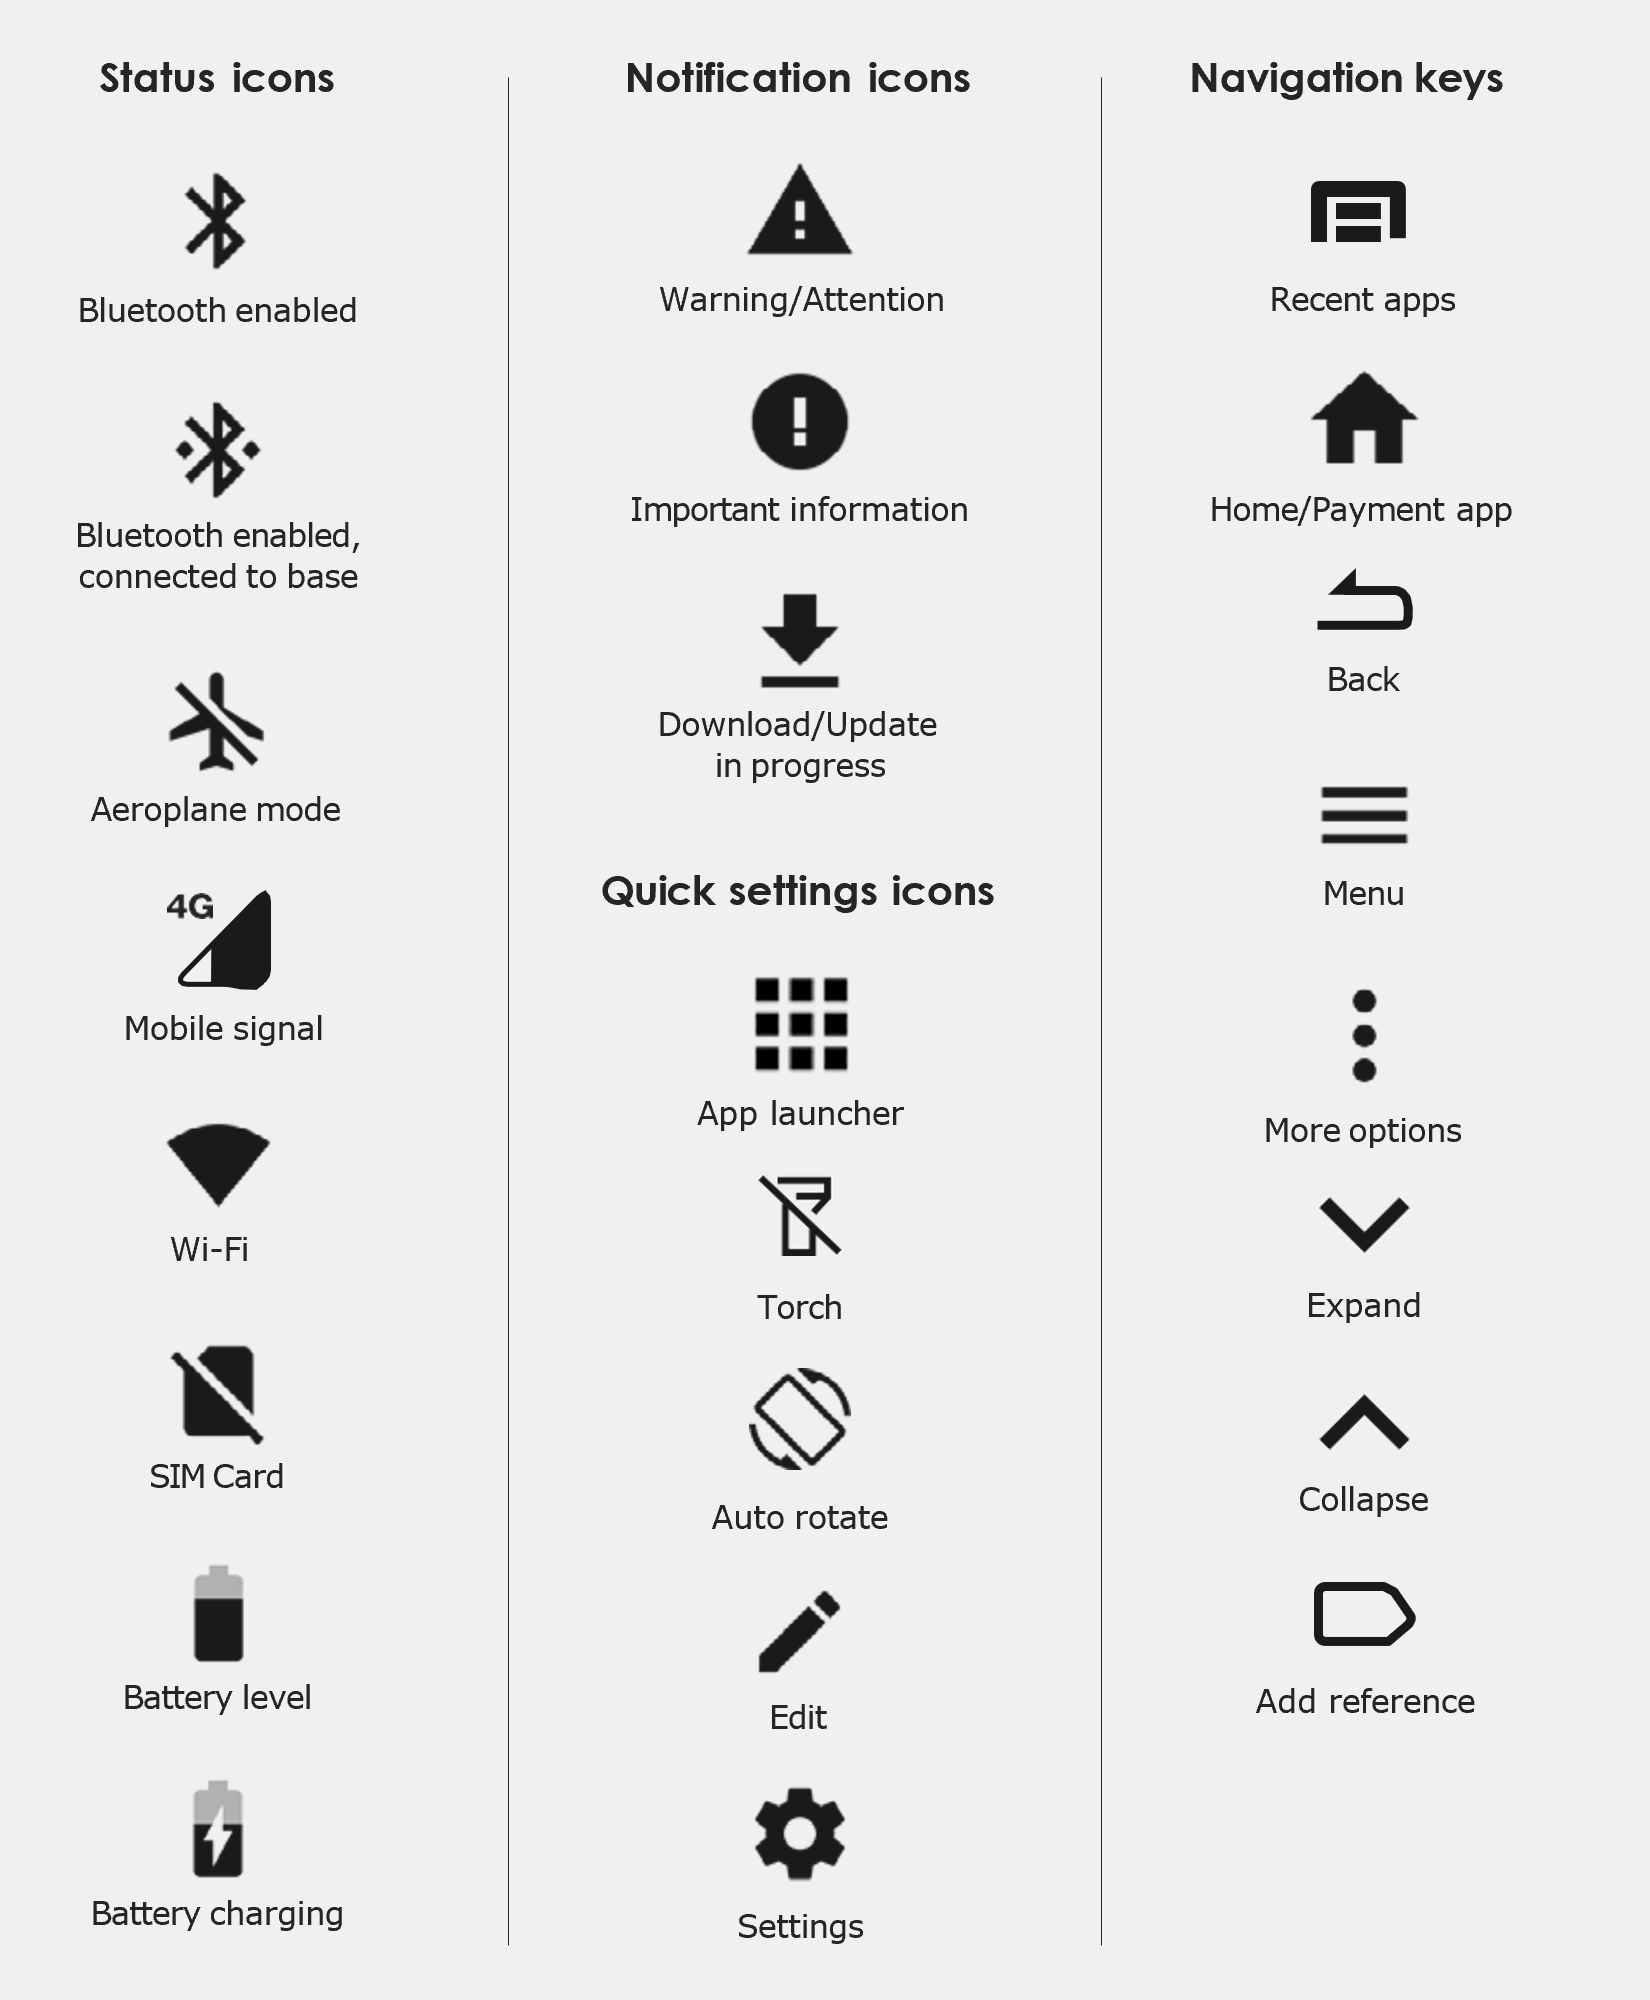
Icons and navigation keys
Important: you can return to the payment app (amount-entry screen) at any time by pressing the Back and/or Home keys.
Install the paper receipt roll
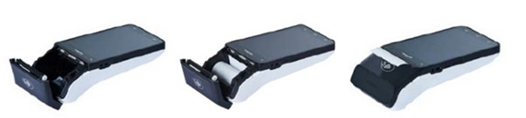
- Open the paper roll compartment by holding the terminal base securely and lifting the sides of the paper compartment door upwards and back.
- Remove any partially used or empty paper roll from the compartment.
- Place a new roll in the compartment. Ensure that the paper end is feeding under the roll and away from the terminal screen.
Important: The paper roll is thermal-sensitive and will only print on one side.
- Pull the end of the paper above the paper compartment door.
- Close the paper compartment door until it clicks securely back into position.
- Tear off and discard any surplus paper.
- Ensure the base of your terminal is connected to a power source.
- Place your terminal on the base. The terminal will automatically turn on.
- The charging symbol will be displayed at the top of the screen. A chime will sound to indicate successful docking.
- The charging indicator LED (see Terminal layout) will be orange while the terminal is charging.
- When the terminal is fully charged the charging indicator LED will be green.
- To turn on: Hold the Power button (see Terminal layout) down for approximately 3 seconds until the terminal turns on.
- To turn off: Hold the Power button down for approximately 1 second until you are prompted with the Power off/Restart Message.
Select the ‘Power off’ option, and the terminal will shut down.
If your terminal has been installed by a technician, your terminal will already be activated ready for use.
If your terminal has been sent to you by satchel you will need to activate your terminal before you can use it.
Call the Merchant Helpdesk on 1800 029 749 to activate your terminal (available 24/7).
Network configuration
| Item | Description |
|---|---|
| Wi-Fi is disabled | |
| Wi-Fi 4 bars (Strong Signal) | |
| Wi-Fi network being referenced is password protected | |
| The terminal is connected to the Wi-Fi access point but does not have a connection to the internet. This means that you need further authentication to get access or there could be a problem with the Wi-Fi router’s connection | |
| The terminal has detected Wi-Fi networks but isn’t connected to any presently |
Configuring your Wi-Fi connection
- Swipe down from the top of the screen to view the status icons.
- Press and hold the Wi-Fi icon. The Wi-Fi settings will open.
- Turn Wi-Fi ‘On’.
- Select your network from the list of available networks.
- Enter the network password and select CONNECT.
- Press the home button to navigate back to the amount–entry screen.
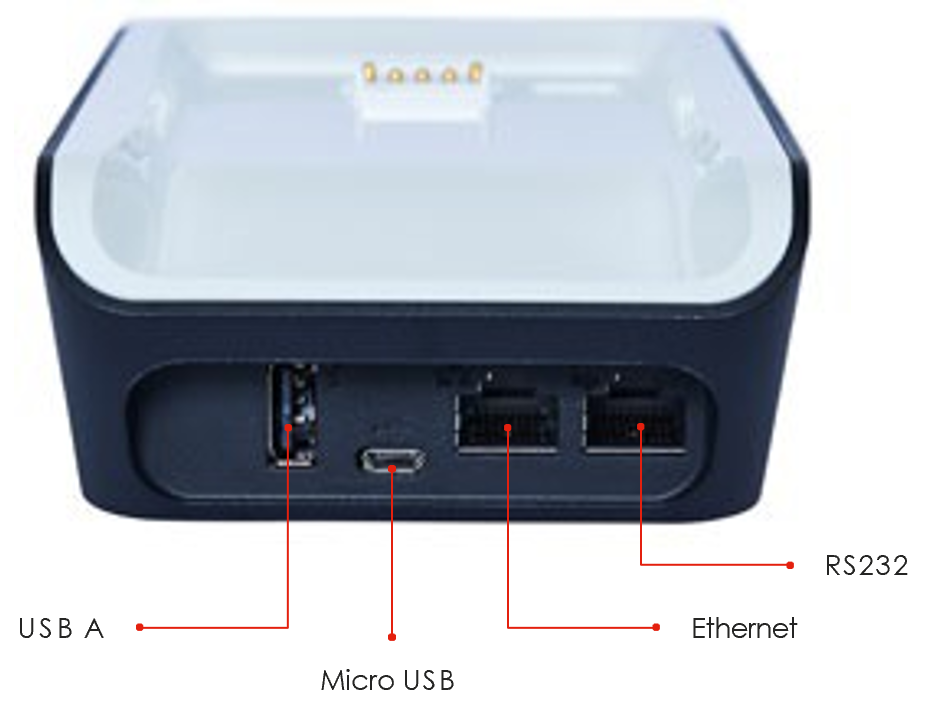
Configuring your ethernet connection
- Connect the ethernet cable to the base.
- Plug one end of the ethernet cable to the port labelled with the icon on the terminal base.
- Plug the other end of the ethernet cable into a free LAN port on your router.
Tip: If your terminal is configured correctly, once your base is successfully connected to your router, the terminal doesn’t need to be on the base to take payments.
To confirm your terminal has successfully connected to ethernet, use the following steps:
- Swipe down from the top of the screen and select the App Launcher.
- Select the Diagnostics App.
- Select Network Information.
- Confirm Connectivity status has a green tick.
- Confirm Online status has a green tick.
- Confirm Connectivity type is Bluetooth.
- Press the home button to navigate back to the amount-entry screen.
Important: Your terminal and base must be successfully paired, to enable ethernet connectivity.
Your terminal will automatically connect to an available 4G network, so you can start processing transactions.
Note: To confirm you have a mobile signal, check the icon in the Status Bar at the top of the screen.
- Swipe down from the top of the screen and select the App Launcher.
- Select the Base Control App.
- The Base Manager menu will be displayed on the screen. In the menu, select Pair a new Dock. Bluetooth will be automatically enabled.
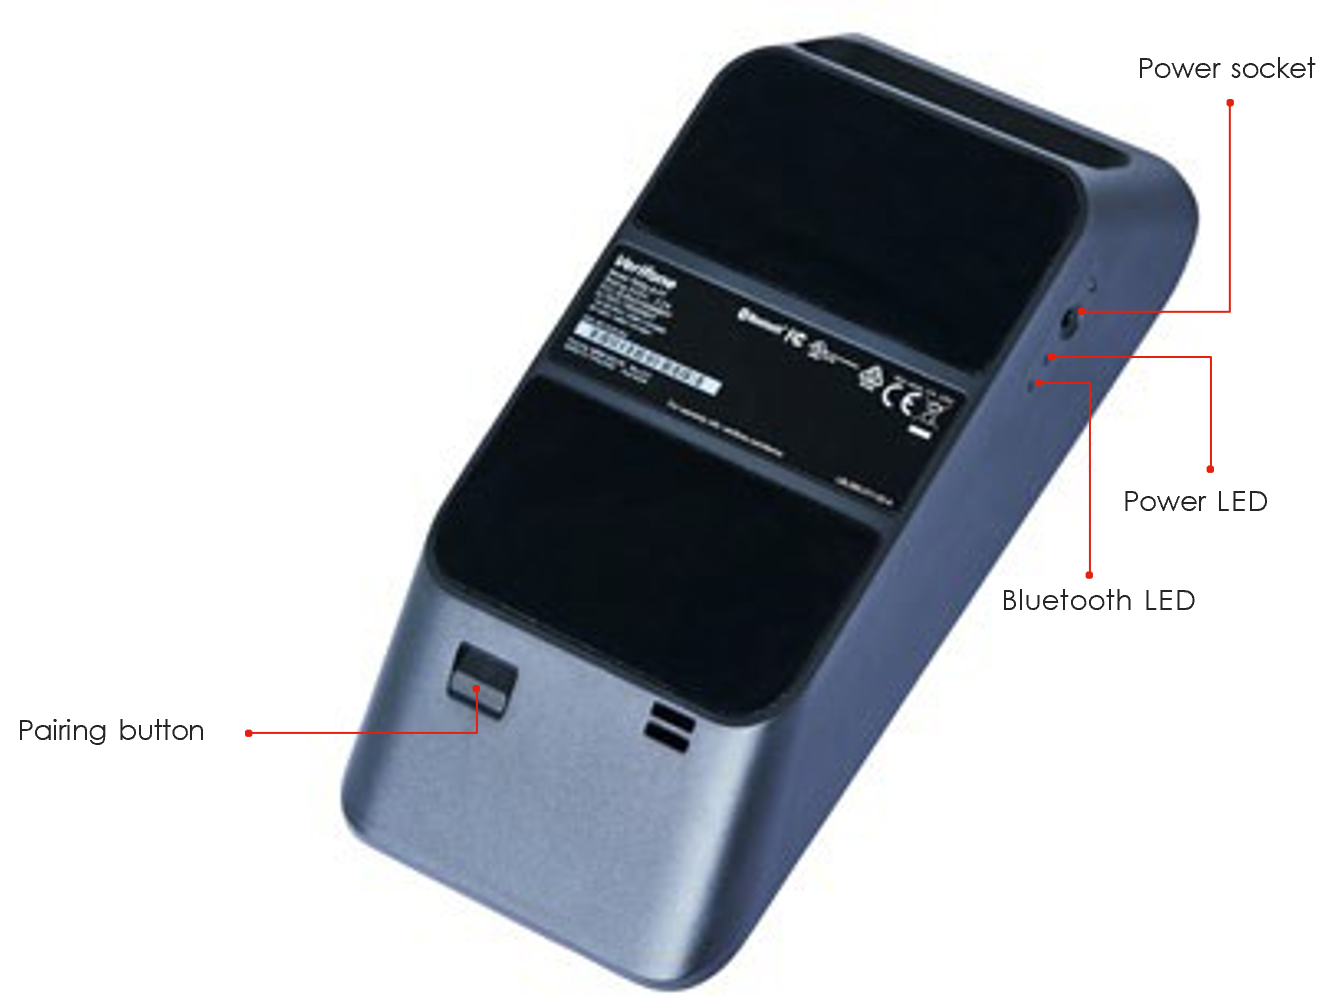
- Connect the power cable to the base unit.
- The white and blue lights will both light up and remain steady for a few seconds before the white light starts blinking.
- Wait until the white light stops blinking and remains steady.
- Press and release the Pairing Button on the base and check that the blue light on the side of the base is blinking.
- Select OK on the terminal.
- Lay the device on its side and point the camera to the lights on the base.
- Select OK on the terminal.
- Use the camera to align the lights on the base within the red rectangle (while the terminal is still laying on its side).
- If the terminal detects any movement, the screen will display ‘Please Hold Still’ to allow the pairing process to work.
Note: The terminal needs to remain steady and still and the pairing lights should be well within the red rectangle. You can do this by laying the base and terminal on a flat, clear surface, making sure there are no bright lights behind the base.
- The ‘Started Pairing’ screen will be displayed for approximately 20 seconds.
- Press and hold the Pairing Button on the base for 3 seconds.
- Wait for the base pairing to be completed.
Note: If the Pairing Button is not held long enough, you’ll get an error message that reads ‘Failed – Unable to pair with base’.
- The ‘Complete’ screen will be displayed when the terminal has been successfully paired to the base.
Passcode management
Your terminal can limit and protect transactions and functionality such as refund, MOTO (Mail Order and Telephone Order), settlements and more, by using passcodes. The passcode levels available are Manager and Cashier.
The passcode requirements are:
- You can’t repeat the same digit more than 3 times
- You can’t enter digits in sequential order (e.g. 1,2,3)
- The Manager passcode must be 6 characters in length
- The Cashier passcode must be 6 characters in length
- Cashier and Manager passcodes can’t be the same.
Note: If your manager passcode hasn’t been configured during installation, or needs to be reset, contact the Merchant Helpdesk on:
1800 029 749 (available 24/7) to have it loaded.
Use this process if you need to change your Manager passcode or change or reset your Cashier passcode.
Note: The Manager passcode is required to change both the Manager passcode and the Cashier passcode.
- Select the menu icon
 located at the top left of the amount-entry screen.
 - Select Settings.
- Select Security.
- Enter the current Manager passcode and press Enter.
- Select Passcode management.
- Select Manager or Cashier.
- Enter the current Manager passcode and press Enter.
- Enter the new Manager or Cashier passcode and press Enter.
- Re-enter the new Manager or Cashier passcode and press Enter.
Note: If you’ve forgotten your manager passcode, contact the Merchant Helpdesk on:
1800 029 749 (available 24/7) to have it reset.
Terminal management
To keep your terminal software up to date, the Bank will automatically download any updates to your terminal on a regular basis. Allow these updates to be completed fully, so your terminal always has the latest configuration and software. Make sure that your terminal is turned on and has connectivity to the Bank.
Generally, this download will occur overnight and will take a minute or two. However, a full software download can take up to 15 minutes (depending on the connection type used in the terminal). If your terminal is unable to connect to the Bank at its scheduled time, it will automatically try again at a later stage.
Your terminal is configured to regularly connect to the Bank. This connection is known as a heartbeat.
The innovative heartbeat technology sends pulse inquiries to your terminal, creating a network of constant communication. There are three types of heartbeats:
Regular - scheduled hourly.
Maintenance - scheduled everyday between midnight and 6:00 am, Sydney time
(e.g. terminal software updates).
Manual - forces configuration changes to take effect immediately.
You aren’t generally required to complete any heartbeats. The terminal automatically completes the heartbeat on a regular basis and will pick up any configuration changes at that time.
If you’ve requested an update or change to your terminal, you can either wait for the regular heartbeat or complete the manual heartbeat yourself.
Select the menu icon ![]() located at the top left of the amount-entry screen. > select Request Heartbeat. A message will display for a successful heartbeat connection.
located at the top left of the amount-entry screen. > select Request Heartbeat. A message will display for a successful heartbeat connection.
Your terminal will enter sleep mode at various times when not in use. Sleep mode is a power-saving mode and will generally activate after 1 minute of inactivity. In sleep mode, the terminal will display the screensaver if connected to power. If the terminal isn’t connected to power, the screen will turn off.
- If the terminal is on the base or connected to power, the screen saver will activate during sleep mode. To wake the terminal, tap the screen or lift the terminal from the base or disconnect the power. The terminal will be ready for you to enter a payment amount.
- When waking the terminal for the first time in the morning or after a reboot, you’ll need to swipe up from the bottom of the screen to access the payment App.
- If the terminal isn’t connected to power, the screen will turn off during sleep mode.
- To wake the terminal, press and release the power button. The terminal will be ready for you to enter a payment amount.
Note: You can put the terminal into sleep mode at any time by pressing and releasing the power button.
Processing transactions
The EFTPOS Now terminal supports contactless transactions. The contactless reader is located at the top of the screen above the paper compartment door.
Instructions:
- When prompted by the terminal, position the contactless card over the paper compartment door.
- Wait for the confirmation ‘beeps’ before removing the card.
The EFTPOS Now terminal supports chip card transactions. The chip card reader is located at the bottom of the terminal.
Instructions:
- Position the chip card with the chip facing upward and towards the terminal.
- Insert the chip card into the chip card reader slot in a smooth, continuous motion (pushing it in as far as it can go).
- The card should remain inserted in the terminal until the transaction is complete, and the terminal prompts you to remove it.
- If there’s an error with reading the chip on the card, the terminal may prompt you to swipe the card.
The EFTPOS Now terminal supports magnetic stripe card transactions. The magnetic stripe reader is located on the right-hand side of the terminal.
Instructions:
- Position the magnetic stripe card in the card reader with the stripe facing inward, towards the terminal.
- To ensure a proper read of the magnetic stripe card, insert the magnetic stripe card at the top of the card reader slot.
- Swipe the card smoothly through the magnetic card reader.
- If there is no response from the terminal, or if a CARD ERROR message is displayed, swipe the card again. You may need to swipe faster or slower.
- If you swipe a chip card, the terminal may prompt you to insert the card instead.
You can cancel a transaction at any point by pressing the Cancel button in the top right corner. However, it’s important to remember that you need to press the Cancel button before ‘Authorising’ is displayed on the screen for the transaction.
What’s a CCV?
CCV security codes are a way to lessen the risk of fraud and chargeback when the cardholder is not physically present.
A CCV security code is printed on the card but does not appear on receipts. When you key in the CCV code, a check is made that the code matches the card number. This gives the merchant greater assurance that the customer is in possession of the card.
Note: CCV (Card Check Value) is also known as CVV and CVC.
Where can I find the CCV security code?
Some cards, such as Mastercard and Visa, have a three-digit CCV printed on the signature panel on the back of the card. There may be other numbers before the CCV – in that instance, the last three digits on the signature panel are the CCV.
Other cards, such as American Express, have a four-digit CCV on the front of the card, above the account number. Some cards don’t have a CCV.
Should I save CCV security codes?
No, never store the CCV codes as they must remain confidential. You should not write them down or save them electronically. Doing so might lead to misuse of the information and put your business at risk. CCV codes should only be used with the initial transaction for authorisation but never stored for future transactions.
The terminal offers cardholders the option to receive a copy of their receipt via email. This helps deliver a more sustainable, eco-friendly payment experience.
Steps:
- At the end of a transaction, cardholders are offered several options on how they’d wish to receive their receipt
- Cardholders can request their receipt to be:
• Printed, by selecting Print
• Emailed, by selecting Email
• Both printed and emailed, by selecting Print & Email - If no receipt is required select No Thanks, or if no option is selected, the terminal will return to the amount-entry screen.
- If a cardholder chooses to receive their receipt by email, they will be prompted to enter an email address.
- Once the cardholder has entered their email address, select Send.
- From the amount-entry screen, use the touch screen to enter the purchase amount
(e.g. $1500 = 150000).
Important: If a correction is required press C to clear the value or press to remove the last number entered.
- Select Purchase.
Note: If you have tipping enabled, the cardholder will be prompted to select a tip amount at this point. They can choose a pre-defined amount, enter a custom amount by selecting Other, or opt not to add a tip by selecting No Tip.
- The terminal will prompt the cardholder to tap, insert or swipe their card or payment-enabled device (e.g. phone, smart watch, or wearable device).
Important: The position of the card reader for tap transactions is above the paper compartment door.
- If the cardholder has chosen to insert or swipe their card, the terminal will prompt them to select the account type or application they want to use.
Important: The terminal will only display the available application or accounts for their card.
- The cardholder will be required to enter their Personal Identification Number (PIN).
Note: If the cardholder doesn’t wish to enter a PIN, you can skip (Bypass) this step for certain card types by leaving the PIN blank and select Enter.
The cardholder will need to provide a signature to authorise the transaction. They’ll need to sign directly on the screen using their finger and will be prompted to return the terminal to you for verification.
You’ll be prompted to approve or decline the signat ure.
If the signature matches the one on the back of the card, select Yes, Approve or select No to cancel the transaction.
Note: If the cardholder requires to re-enter their signature, select Clear.
- Once the transaction has been processed, the terminal screen will display whether the transaction has been approved or declined.
Important: If a chip card was inserted and is yet to be removed, a prompt will appear to remove the card. The terminal will beep as a reminder if the card isn’t removed.
- The terminal will print a merchant copy of the receipt (if the cardholder signed, the signature will be on this copy).
- The terminal will prompt a customer copy of the receipt to be printed or emailed.
Important: Always check the receipt to confirm the transaction has been approved.
If enabled, your terminal can process purchases with cash out transactions, available from cheque or savings accounts only.
You may enable or disable the cash out feature by contacting the Merchant Helpdesk on:
1800 029 749 (available 24/7).
- From the amount-entry screen enter the purchase amount (e.g. $10.00 = 1000).
Note: If a correction is required press C to clear the value or press to remove the last number entered.
- Select Other.
- Select Purchase + Cash Out.
- Select the Cash Out amount from the pre-set options displayed on the screen or select Other to enter a different amount.
- The terminal will prompt the cardholder to tap, insert, or swipe their card or payment-enabled device (e.g. Google Pay, Apple Pay).
Note: The position of the card reader for tap transactions is above the paper compartment door.
- If the cardholder has chosen to insert or swipe their card, the terminal will prompt them to select the account type or application they want to use (Cheque or Savings options only).
Important: The terminal will only display the available application or accounts for their card.
- The cardholder will be required to enter their Personal Identification Number (PIN).
- Once the transaction has been processed, the terminal screen will display whether the transaction has been approved or declined.
Important: If a chip card was inserted and is yet to be removed, a prompt will appear to remove the card. The terminal will beep as a reminder if the card isn’t removed. - The terminal will print a merchant copy of the receipt.
- The terminal will prompt a customer copy of the receipt to be printed or emailed.
For further information on emailing receipts refer to section Email receipts.
- The Cash Out confirmation screen will be displayed.
- Select Done once the cash has been provided to the cardholder.
Important: Always check the receipt to confirm the transaction has been approved.
If enabled, your terminal can process purchases with cash out transactions, available from cheque or savings accounts only.
You may enable or disable the cash out feature by contacting the Merchant Helpdesk on:
1800 029 749 (available 24/7).
- From the amount-entry screen enter the Cash out amount (e.g. $10.00 = 1000).
Note: If a correction is required press C to clear the value or press to remove the last number entered. - Select Other.
- Select Cash Out Only.
- The terminal will prompt the cardholder to tap, insert, or swipe their card or payment-enabled device (e.g. phone, smart watch, or wearable device).
Note: The position of the card reader for tap transactions is above the paper compartment door. - If the cardholder has chosen to insert or swipe their card, the terminal will prompt them to select the account type or application they want to use (Cheque or Savings options only).
Important: The terminal will only display the available application or accounts for their card. - The cardholder will be required to enter their Personal Identification Number (PIN).
- Once the transaction has been processed, the terminal screen will display whether the transaction has been approved or declined.
Important: If a chip card was inserted and is yet to be removed, a prompt will appear to remove the card. The terminal will beep as a reminder if the card isn’t removed. - The terminal will print a merchant copy of the receipt.
- The terminal will prompt a customer copy of the receipt to be printed or emailed.
For further information on emailing receipts refer to section Email receipts. - The Cash Out confirmation screen will be displayed.
- Select Done once the cash has been provided to the cardholder.
Important: Always check the receipt to confirm the transaction has been approved.
If enabled, your terminal can process refund transactions. A refund transaction is used to reverse a purchase that has previously been processed.
A refund transaction should allow any amount below or equal to the Daily Refund Limit. To find out your Daily Refund Limit or if you wish to perform a refund transaction over the Daily Refund Limit, simply contact the Merchant Helpdesk on 1800 029 749 (available 24/7).
You can process a refund transaction for any of the following:
- returned goods purchased that are accepted under your Returns Policy
- services that are terminated or cancelled
- incorrect amount charged (price adjustment).
You must not:
- offer or provide a cash refund when the original purchase was made using a debit
or credit card - make a refund to a card that was not used for the original purchase transaction.
If you initiate an invalid refund, as described above, and the cardholder disputes the original purchase transaction, you may be liable for a Chargeback claim. This would result in the Bank debiting your merchant account for the original purchase transaction and additional fees. A Chargeback reverses a transaction made on a debit or credit card. If you initiate a refund on an international card, you’ll need to inform the cardholder that the refund amount appearing on their account statement may be different from the amount on the original purchase transaction. This is due to a potential variation in the exchange rates used on each transaction.
Instructions to process a refund
- From the amount-entry screen, enter the refund amount (e.g. $25 = 2500).
Note: If a correction is required press C to clear the value or press to remove the last number entered. - Select Other.
- Select Refund.
- Enter the Manager passcode.
Important: Refer to section Passcode management if passcodes haven’t been set up. - Select Enter.
- Select Card or Mobile.
- The terminal will prompt the cardholder to tap, insert, or swipe their card or payment-enabled device (e.g. phone, smart watch, or wearable device).
Important: The position of the card reader for tap transactions is above the paper compartment door. - If the cardholder has chosen to insert or swipe their card, the terminal will prompt them to select the account type or application they want to use.
Important: The terminal will only display the available application or accounts for their card. - The cardholder will be required to enter their Personal Identification Number (PIN).
Important: If the cardholder doesn’t wish to enter a PIN, you can skip (Bypass) this step for certain card types by leaving the PIN blank and select Enter.
The cardholder will need to provide a signature to authorise the transaction. They’ll need to sign directly on the screen using their finger and will be prompted to return the terminal to you for verification.
You’ll be prompted to approve or decline the signature. If the signature matches the one on the back of the card, select Yes, Approve or select No to cancel the transaction.
Note: If the cardholder requires to re-enter their signature, select Clear. - Once the transaction has been processed, the terminal screen will display whether the transaction has been approved or declined.
Important: If a chip card was inserted and is yet to be removed, a prompt will appear to remove the card. The terminal will beep as a reminder if the card isn’t removed. - The terminal will print a merchant copy of the receipt.
- The terminal will prompt a customer copy of the receipt to be printed or emailed.
For further information on emailing receipts, refer to section Email receipts.
Important: Always check the receipt to confirm the transaction has been approved.
Transactions initiated by mail or telephone are known as MOTO transactions. MOTO transactions can be processed on credit and charge cards. You have the option to either add passcode security to all MOTO transactions or just to MOTO transactions over $100.
For more information on how to register as a MOTO merchant, contact the Merchant Helpdesk: 1800 029 749 (available 24/7).
Important:
- Until you are registered as a MOTO merchant, you must not process MOTO transactions.
- An authorisation of a MOTO transaction only establishes that the funds are available in the cardholder’s account and that the card has not been reported lost or stolen. It doesn’t guarantee that the person whose name appears on the card is making the purchase or that the purchase will not be subject to a chargeback.
- You’ll be liable for all Chargebacks on MOTO transactions.
- You must retain all merchant receipts for at least 18 months from the transaction date.
- When performing MOTO transactions, you may be prompted for the Cashier passcode.
Instructions to process a MOTO transaction
- From the amount-entry screen, enter the purchase amount (e.g. $25 = 2500).
Note: If a correction is required press C to clear the value or press to remove the last number entered. - Select Other.
- Select Manual Card Entry.
- Select Mail Order or Phone Order.
- Enter the card number.
Important: The terminal will only display the first 6 digits of the card to maintain customer security. - Select Enter.
Important: The first 6 digits and the last 4 are now visible. - Select Confirm.
- Enter the card expiration date in the format MM/YY.
Important: If a correction is required select Cancel - Select Enter.
- If Mail Order was selected, proceed to step 12. If Phone Order was selected, proceed to the next step.
- Enter the CVV and select Enter, or if no CVV is present, select Enter. Select the reason for no CVV.
- Once the transaction has been processed, the terminal will display whether the transaction has been approved or declined.
Note: If the transaction is declined, the terminal will beep and display an error message giving the reason. - The terminal will prompt for a customer copy of the receipt to be printed or emailed.
For further information on emailing receipts, refer to section Email receipts.
Important: Always check the receipt to confirm the transaction has been approved.
The surcharge feature is optional. You may enable or disable this feature by contacting the Merchant Helpdesk on: 1800 029 749 (available 24/7).
Surcharge provides the ability to add an additional processing fee to the transaction. Surcharge may be a fixed dollar value or a percentage value and can be added to credit cards, debit cards and charge cards.
Surcharge rates cannot exceed the Cost of Acceptance of the transaction. Cost of Acceptance information can be found on your Merchant Statement.
Note: Surcharge is applied to the purchase component of transactions only. This means if a purchase transaction also has Cash Out and/or a Tip, the surcharge is calculated on the purchase amount only. In addition, a surcharge will apply to MOTO transactions and Pre-Authorisation transactions (quoted at Pre-Authorisation and added at Completion).
Instructions:
- From the amount-entry screen, use the touch screen to enter the purchase amount. (e.g. $1500 = 150000).
Note: If a correction is required press C to clear the value or press to remove the last number entered. - Select Purchase.
- If the surcharge value is identical for all card types, it will be added to the purchase amount and displayed on the Present Card screen. An on-screen message will be displayed indicating a surcharge value has been applied.
- When various card types carry different surcharge values, the ‘Surcharge may apply’ message will be displayed on the Present Card screen.
The cardholder can select Surcharge (i) to preview the applicable surcharge amounts for the various card types. - Once the cardholder has previewed the applicable surcharge amount on the screen, they will need to select Accept or Cancel Transaction.
- The cardholder can either tap, insert, or swipe their credit card. If the cardholder has tapped their card, proceed to step 9. If the cardholder has chosen to insert or swipe their card, proceed to the next step.
- If the cardholder has chosen to insert or swipe their card, the terminal will prompt them to select the account type or application they want to use.
Important: The terminal will only display the available application or accounts for their card. - The Confirm Surcharge screen will be displayed. The cardholder will be required to confirm the surcharge amount.
- The cardholder will be required to enter their Personal Identification Number (PIN).
Important: If the cardholder doesn’t wish to enter a PIN, you can skip (Bypass) this step for certain card types by leaving the PIN blank and select Enter.
The cardholder will need to provide a signature to authorise the transaction. They’ll need to sign directly on the screen using their finger and will be prompted to return the terminal to you for verification.
You’ll be prompted to approve or decline the signature. If the signature matches the one on the back of the card, select Yes, Approve or select No to cancel the transaction.
Note: If the cardholder requires to re-enter their signature, select Clear. - The terminal will process the transaction.
- The screen will display the total amount along with the surcharge.
- The terminal will process the transaction and then display either approved or declined.
- If a chip card was inserted and is yet to be removed, the terminal will prompt the cardholder to remove the card from the chip card slot.
- The terminal will print a merchant copy of the receipt (if the cardholder signed, the signature will be on this copy).
- The terminal will prompt a customer copy of the receipt to be printed or emailed. For further information on emailing receipts, refer to section Email receipts.
Important: Always check the receipt to confirm the transaction has been approved.
Split billing is a feature that provides cardholders with options on how to pay their share of the bill – either by credit card or debit card.
The Split Billing features is an optional function. You may enable or disable this feature by contacting the Merchant Helpdesk on: 1800 029 749 (available 24/7).
Split billing (equal)
Equal Split purchase allows a bill to be divided equally between cardholders. By default, the terminal divides the total payment amount into 2 equal parts.
- From the amount-entry screen, enter the Purchase amount.
- Select Other.
- The Other Options menu will be displayed.
- Select Split Billing.
- The terminal displays both the total purchase amount, as well as the remaining purchase amount to be paid. Equal Parts is selected by default and will display the number in which the payment will be divided. It can be changed using the ‘+’ or ‘– ‘options.
- Select Purchase
Note: Equal Parts divide the purchase amount to be equal to the total amount divided by the number of parts specified. - The terminal will prompt the cardholder to tap, insert, or swipe their card or payment-enabled device (e.g. phone, smart watch, or wearable device).
- If the cardholder has chosen to insert or swipe their card, the terminal will prompt them to select an application or account type for the card entered.
- The cardholder will be required to enter their Personal Identification Number (PIN).
Important: If the cardholder doesn’t wish to enter a PIN, you can skip (Bypass) this step for certain card types by leaving the PIN blank and pressing Enter. - The cardholder will need to provide a signature to authorise the transaction. They’ll need to sign directly on the screen using their finger and will be prompted to return the terminal to you for verification. You’ll be prompted to approve or decline the signature. If the signature matches the one on the back of the card, select Yes, Approve.
- Once the transaction is processed, the terminal will display whether the transaction has been Approved or Declined.
Important: If a chip card was inserted and is yet to be removed, a prompt will appear to remove the card. The terminal will beep as a reminder if the card isn’t removed. - The terminal will print a merchant copy of the receipt. It will then prompt the cardholder to select how they wish to receive their customer copy of the receipt, (e.g. printed or emailed).
- Once the Split Payment is complete, the terminal displays the Split Billing screen with the remaining amount.
- Press Purchase to continue with Next Split Payment with remaining amount. Follow step 5 to 12 for the remaining payments.
- The terminal will display the Split Billing Details with Total Split amount followed by an individual transaction breakdown.
Split Billing (unequal)
Unequal Split purchase allows your customer to pay their contribution of the bill
- From the amount-entry screen, enter the Purchase amount. E.g. $100 = 10000.
- Select Other. The Other options menu will be displayed.
- Select Split Billing
- Terminal displays the total Purchase amount and remaining purchase amount to be paid.
- Select Amount
- Select the amount field
- Enter amount and select Enter
- The Split amount is visible on the Purchase button. Press Purchase
- The terminal will prompt the cardholder to tap, insert, or swipe their card or payment-enabled device (e.g. phone, smart watch, or wearable device).
- If the cardholder has chosen to insert or swipe their card, the terminal will prompt them to select an application or account type for the card entered.
- The cardholder will be required to enter their Personal Identification Number (PIN).
Important: If the cardholder doesn’t wish to enter a PIN, you can skip (Bypass) this step for certain card types by leaving the PIN blank and pressing Enter. - The cardholder will need to provide a signature to authorise the transaction. They’ll need to sign directly on the screen using their finger and will be prompted to return the terminal to you for verification. You’ll be prompted to approve or decline the signature. You will be prompted to approve or decline the signature. If the signature matches the one on the back of the card, select Yes, Approve.
- Once the transaction is processed, the terminal will display whether the transaction has been Approved or Declined.
Important: If a chip card was inserted and is yet to be removed, a prompt will appear to remove the card. The terminal will beep as a reminder if the card isn’t removed. - The terminal will print a merchant copy of the receipt. It will then prompt the cardholder to select how they wish to receive their customer copy of the receipt, (e.g. printed or emailed).
- Once the Split Payment is completed, the terminal displays the Split Billing screen with the remaining payments.
- If you wish to split the amount further, select Amount and enter required value as per step 8 above and follow steps 7 to 15.
- If no further splits are required then Press Purchase to finalise the remaining split payment.
- The terminal will display the Split Billing Details with the Total Split amount followed by an individual transaction breakdown.
Navigator – Accessibility and Assistance mode
Navigator provides accessibility, assistance and a PIN entry solution for cardholders who may have accessibility, or assistance needs when using a touch-screen terminal. It enables vision impaired and other cardholders, who may require assistance, to enter their PIN independently and securely.
An accessibility chime will be played periodically on the Present Card screen to enable the cardholder to identify that the terminal has the Navigator function available.
Navigator has three modes:
- Assistance mode – supports colour-vision impaired and low vision cardholders, or cardholders who may require further assistance to process their transactions. The terminal screen has a larger font size and provides different colour contrast options and audio prompts during the transaction. The PIN entry keypad is full screen, and the numbers are displayed in large font and full colour.
- Accessibility mode – supports cardholders who are blind or have low vision. The terminal provides step-by-step audio instructions throughout the transaction, along with tactile markers positioned around the edge of the touch screen. The tactile markers assist cardholders in navigating the position of the numbers on the PIN entry keypad. The terminal has three tactile markers positioned across the top and bottom of the screen, representing the position of the columns of the keypad, and four markers positioned down the left and right of the screen representing the position of the rows of the keypad. The PIN entry keypad is full screen, and the screen is blank for security.
- Training mode – can be used by you and your staff or cardholders. It provides a simulated and guided step-by-step audio walkthrough of the Navigator function.
Support guides, including videos and audio are available at westpac.com.au/eftposaccessibility
To activate Accessibility mode, you or the cardholder can either:
- Double-tap anywhere on the Present Card screen.
- Tap the yellow Navigator (Accessibility/Assistance) icon on the Present Card screen and then tap Speech for Vision Impaired.
- Press the power button (off/on) – this button doubles as the Accessibility button.
Note: To assist orientation with the touch screen, your terminal has tactile markers positioned around the screen to guide vision impaired cardholders.
Processing a purchase transaction in Accessibility mode
- From the amount-entry screen, enter the purchase amount, (e.g. $10.00 = 1000).
- Select Purchase.
- Activate accessibility mode by double-tapping the screen, tapping the yellow navigator icon or pressing the power button.
- If the yellow Navigator icon is used to activate Accessibility mode, proceed to the next step. Or proceed to step 7.
- Select Speech for Vision Impaired.
- Double-tap the terminal screen or press the power button on the side.
- When this mode is activated, the total amount and the prompt to present the card will be vocalised (i.e. “The total amount is… please present your card.”).
Important: To increase the volume of the voice prompts, use the volume buttons located on the left side of the terminal. Alternatively, the cardholder may connect headphones to the terminal using the headphone jack on the left side of the terminal. - The terminal will prompt the cardholder to tap, insert or swipe their card or payment-enabled device (e.g. phone, smart watch, or wearable device).
Important: The position of the card reader for tap transactions is above the paper compartment door. - Account selection can be done by swiping left or right to reveal the next account option. Each option is vocalised. When the correct option is heard, the cardholder uses the selection method they have chosen to select the correct account or application (e.g. by pressing the power button or by double-tapping the terminal screen).
- The cardholder will be prompted to enter their PIN using voice prompts. The screen appears blank, but there is a virtual keypad similar to a telephone that can be used to enter a PIN.
- We recommend that the cardholder orients themselves by starting at the corner of the screen. The terminal will beep as the cardholder drags their finger along each number. This allows the cardholder to count the number of beeps heard and work out the number their finger is on. The cardholder then selects the required number using the chosen method selected at the Present Card screen (e.g. by pressing the power button or by double-tapping the terminal screen). The cardholder repeats this for each number of their PIN and then locates OK to enter the PIN.
- The audio prompts will communicate the current transaction step to the cardholder. Once the transaction has been processed, the terminal screen will display whether the transaction has been approved or declined.
- Audio prompts will also inform the customer that the payment is completed and to remove the card if it’s still inserted.
- The cardholder can then select their preferred receipt option.
To activate assistance mode, you or the cardholder can:
- Tap the yellow Navigator eye (Accessibility/Assistance) icon on the Present Card screen and then tap Colour/Large Text.
- There are four different colour combinations provided.
Important: When assistance mode is activated, all remaining screens in the current transaction payment flow will utilise the selected colours, contrast, and magnification.
To process a Purchase transaction in Assistance Mode
- From the amount-entry screen, enter the purchase amount, (e.g. $10.00 = 1000).
- Select Purchase.
- Activate assistance mode by tapping the yellow navigator icon.
- Select Colour/Large Text.
- The cardholder is prompted to select the contrast colour that best assists them by tapping on one of the four colour options on the screen.
- The screens for the current transaction will continue to show the colour option that was selected. Screen prompts will be read aloud, and the keypad will be optimised to improve visibility for colour-vision impaired and low vision cardholders.
Important: To increase the volume of the voice prompts, use the volume buttons located on the left side of the terminal. Alternatively, the cardholder can connect the headphones to the terminal using the headphone jack on the left side of the terminal. - If the cardholder has chosen to insert or swipe their card, the terminal will prompt them to select the account type or application they want to use.
Important: The terminal will only display the available application or accounts for their card. - An audio prompt will prompt the cardholder to enter their PIN.
- Once the transaction has been processed, the terminal screen will display whether the transaction has been approved or declined.
Important: If the card was inserted and is yet to be removed, the terminal will continue to beep until the card is removed. - The cardholder can then select their preferred receipt option.
Pre-authorisation transactions
The Pre-Authorisation feature is optional. You may enable or disable this feature by contacting the Merchant Helpdesk on 1800 029 749 (available 24/7).
A Pre-Authorisation is used to reserve funds on a card for a sale to be processed at a later time. Car rental companies and hotels/motels most commonly use this function. The funds are not debited from the cardholder’s account until the final payment is processed. A Pre-Authorisation completion must be performed to process the final payment.
Note:
- Pre-Authorisation transaction can only be performed on credit cards and charge cards and only where you have been authorised to do so.
- It’s important that the Pre-Authorisation receipt is retained. This receipt contains the RRN that is required to enable you to complete the Pre-Authorisation more easily.
- Pre-Authorisations will be held on the customer’s card for a period of up to 31 days unless the Pre-Authorisation is completed or cancelled. The length of time funds are held may vary by card scheme and may depend on the rules set by the cardholder’s issuing bank.
- Refer to the table below for the action you can perform on a Pre-Authorisation transaction, by scheme.
| Transaction Type | Visa | Mastercard | UnionPay | American Express | JCB | Domestic Debit (Sav/Chq) |
|---|---|---|---|---|---|---|
| Pre-Authorisation | ✓ | ✓ | ✓ | ✓ | ✓ | X |
| Pre-Authorisation Complete | ✓ | ✓ | ✓ | ✓ | ✓ | X |
| Pre-Authorisation Adjust (Top Up and Partial Cancel) | ✓ | ✓ | X | X | X | X |
| Pre-Authorisation Cancel | ✓ | ✓ | ✓ | X | X | X |
| Pre-Authorisation Extend | ✓ | ✓ | X | X | X | X |
| Account Verify | ✓ | ✓ | X | X | X | X |
Instructions
- From the amount-entry screen, enter the Pre-Auth amount (e.g. $50 = 5000).
Note: If a correction is required, select Clear to clear the value or select Cancel to remove the last number entered. - Select Other.
- The Other Options menu will be displayed.
- Select Pre-Authorisation.
- From the Payment Options screen, select Card or Manual if entering the card number manually.
- If Manual was selected at step 5, proceed to step 13.
- If Card was selected at step 5, proceed to the next step.
- The terminal will prompt the cardholder to insert or swipe their card.
- The terminal will prompt the cardholder to select the account type or application they want to use.
Important: The terminal will only display the available application or accounts for their card. - The cardholder will be required to enter their Personal Identification Number (PIN).
Important: If the cardholder doesn’t wish to enter a PIN, you can skip (Bypass) this step for certain card types by leaving the PIN blank and pressing Enter. - The cardholder will need to provide a signature to authorise the transaction. They’ll need to sign directly on the screen using their finger and will be prompted to return the terminal to you for verification. You’ll be prompted to approve or decline the signature.
- If the signature matches the one on the back of the card, select Yes, Approve or select No to cancel the transaction.
Note: If the cardholder requires to re-enter their signature, select Clear. - If Manual was selected at step 5, enter the card number.
Important: The terminal will only display the first 6 digits of the card to maintain customer security. - Select Enter.
Important: The first 6 digits and the last 4 are now visible. - Select Confirm.
- Enter the card expiration date in the format MM/YY.
- Select Enter.
- Enter the CCV and select Enter, or if no CCV is present, select Enter. Select the reason for no CCV.
- Once the transaction has been processed, the terminal screen will display whether the transaction has been approved or declined.
Important: If a chip card was inserted and is yet to be removed, a prompt will appear to remove the card. The terminal will beep as a reminder if the card isn’t removed. - The terminal will print a merchant copy of the receipt (if the cardholder signed, the signature will be on this copy).
- The terminal will prompt a customer copy of the receipt to be printed or emailed.
Important: Always check the receipt to confirm the transaction has been approved.
Once a Pre-Authorisation is processed, use the Pre-Auth Report to search for it and process any additional transactions for that Pre-Authorisation. The additional transactions that you’re able to process may include Completions, Cancellations, Extends or Adjusts.
Using the Pre-Auth Report
You can search for open pre-authorisation transactions using the Pre-Auth Report.
This report allows you to search for open and expiring Pre-Authorisations at both a merchant, and terminal level.
- Select the menu icon located at the top left of the amount-entry screen.
- Select Reports.
- Select Pre-Auth Report.
- Select By Merchant to search for all open pre-authorisations under the merchant facility and select the Search button.
- The Pre Authorisation transaction history will be displayed and organised by date and time.
- You can scroll up and down the screen to locate the required transaction.
- Select the required transaction.
Card search.
The transaction must be within the last 14 days. Select the card icon in the search bar.
- Tap, insert, or swipe the card to start the search.
- Select the required transaction.
A Pre-Authorisation completion is used to charge the cardholder the final transaction amount and remove the reserved/held funds from an earlier Pre-Authorisation transaction (this includes any adjustments that may have been processed).
- To process the completion transaction, first search and locate the relevant Pre-Authorisation transaction by following the steps outlined in Searching for Pre-Authorisation Transactions.
- The Pre-Authorisation transaction will be displayed, with the available transaction types that can be processed. The transaction types offered will vary depending on the card type used and the length of time since the original Pre-Authorisation transaction was processed.
Transaction types offered may include:- Receipt
- Cancel
- Complete
- Extend
- Adjust
Important: If the amount of the final completion is less than the subtotal displayed on the terminal, you’ll need to release the difference in the amount to the cardholder by performing a Pre Auth – Adjust prior to performing your completion.
- Select Complete
- Select Same Amount and then Submit.
Important: Terminal will display the ‘Maximum Complete Amount’. The transaction can’t exceed this amount. - The terminal will display whether the transaction has been approved or declined.
- The terminal will print a merchant copy of the receipt. It will then prompt the cardholder to select how they wish to receive their customer copy of the receipt, (e.g. printed or emailed).
- Once the completion has been finalised, you will be returned to the Transaction Details screen where the transaction history can be viewed.
Important: No extended Pre-Auth options will be available once Completion is done.
A Pre-Authorisation cancellation is used to fully cancel a Pre-Authorisation that is no longer required.
- To process the completion transaction, first search and locate the relevant Pre-Authorisation transaction by following the steps outlined in Searching for Pre-Authorisation Transactions.
- The Pre-Authorisation transaction will be displayed, with the available transaction types that can be processed. The transaction types offered will vary depending on the card type used and the length of time since the original Pre-Authorisation transaction was processed
Transaction types offered may include:- Receipt
- Cancel
- Complete
- Extend
- Adjust
- Select Cancel.
- Select the reason for cancellation.
- Select Submit.
The terminal will display whether the transaction has been approved or declined. - The terminal will print a merchant copy of the receipt. It will then prompt the cardholder to select how they wish to receive their customer copy of the receipt, (e.g. printed or emailed).
Note: For further information on emailing receipts, refer to section Email receipts. - Once the cancellation has been finalised, you will be returned to the Transaction Details screen, where you can view the transaction history.
A Pre-Authorisation adjust is used to increase (top up) or decrease (partial cancellation) the value of the original Pre-Authorisation transaction, where the expected value of the final transaction may be higher or lower than the initial Pre-Authorised amount.
The expiry date of the original Pre-Authorisation transaction processed on a Mastercard will also be extended.
- To adjust an existing Pre-Authorisation, firstly search using the steps Searching for Pre-Authorisation transactions.
- The Pre-Authorisation transaction will be displayed, with the available transaction types that can be processed. The transaction types offered will vary depending on the card type used and the length of time since the original Pre-Authorisation transaction was processed.
Transaction types offered may include:- Receipt
- Cancel
- Complete
- Extend
- Adjust
- Select Adjust to increase or decrease the Pre-Authorisation amount.
- Tap in the New Amount field to change the Pre-Authorisation amount.
- Enter the new amount and select Enter.
- Confirm that the subtotal is correct and select Submit.
- The terminal will display whether the transaction has been approved or declined.
- The terminal will print a merchant copy of the receipt.
- It will then prompt the cardholder to select how they wish to receive their customer copy of the receipt (e.g. printed or emailed).
For further information on emailing receipts, refer to section Email receipts. - Once the Adjust (increase/decrease) has been finalised you will be returned to the Transaction Details screen where the transaction history can be viewed.
A Pre-Authorisation extend is used to increase the number of days that the Pre-Authorisation is in effect, up to a further 30 days. The value of the original Pre-Authorisation is not changed.
- To extend existing Pre-Authorisation, firstly search using the steps Searching for Pre-Authorisation transactions.
- The Pre-Authorisation transaction will be displayed, with the available transaction types that can be processed. The transaction types offered will vary depending on the card type used and the length of time since the original Pre-Authorisation transaction was processed.
Transaction types offered may include:- Receipt
- Cancel
- Complete
- Extend
- Adjust
- Select Extend.
- Select Submit.
- The terminal will display whether the transaction has been approved or declined.
- The terminal will print a merchant copy of the receipt (if the cardholder signed, the signature will be on this copy).
- The terminal will prompt for a customer copy of the receipt to be printed or emailed.
- Once the extension has been finalised, you will be returned to the Transaction Details screen, where you can view the transaction history.
- Depending on the performed Pre-Auth changes and their outcomes, there can be a different set of allowed operations. The change history will be updated accordingly. If any value is not yet known (and is still being processed), the screen will display ‘To be updated’.
The account verify function is used to confirm the validity of a card only. No transaction value is processed for this function. No funds are reserved on the card.
- From the amount-entry screen select Other.
- Note: No amount is required to be entered.
- The Other Options will be displayed.
- Select Account Verify.
- Select Card if you’re using the card.
- Select Manual if you’re manually entering the card number.
- If Manual was selected at step 5, proceed to step 9. If Card was selected at step 5, proceed to the next step.
- The terminal will prompt the cardholder to insert or swipe their card.
- The terminal will prompt the cardholder to select the account type or application they want to use.
Important: The terminal will only display the available application or accounts for their card. - The cardholder will be required to enter their Personal Identification Number (PIN).
Important: If the cardholder doesn’t wish to enter a PIN, you can skip (Bypass) this step for certain card types by leaving the PIN blank and pressing Enter. - The cardholder will need to provide a signature to authorise the transaction. They’ll need to sign directly on the screen using their finger and will be prompted to return the terminal to you for verification.
- You’ll be prompted to approve or decline the signature. If the signature matches the one on the back of the card, select Yes, Approve or select No to cancel the transaction.
Note: If the cardholder requires to re-enter their signature, select Clear.
If manual was selected at step 5, enter the card number.
Important: The terminal will only display the first 6 digits of the card to maintain customer security. - Select Enter.
Important: The first 6 digits and the last 4 are now visible. - Select Confirm.
- Enter the card expiration date in the format MM/YY.
- Select Enter.
- Enter the CVV and select Enter, or if no CVV is present, select Enter. Select the reason for no CVV.
- Once the transaction has been processed, the terminal screen will display whether the transaction has been approved or declined.
Important: If a chip card was inserted and is yet to be removed, a prompt will appear to remove the card. The terminal will beep as a reminder if the card isn’t removed. - The terminal will print a merchant copy of the receipt (if the cardholder signed, the signature will be on this copy).
- The terminal will prompt for a customer copy of the receipt to be printed or emailed.
- If the transaction was approved the screen will display Success. If the transaction is declined the screen will display Error.
- Select Continue to return to the home screen.
Processing LitePOS transactions
This section will help you become familiar with the LitePOS feature and its functions, through a step-by-step guide on how to setup and use the LitePOS feature on your terminal.
The LitePOS feature makes the EFTPOS Now terminal a Point of Sale (POS) device. This enables you to add items regularly sold to a catalogue for quick selection at the time of purchase. You can also use the EFTPOS Now terminal to scan barcodes on items that are loaded into the catalogue.
This ensures quick and accurate payments without the need to manually enter the amount each time you make a sale.
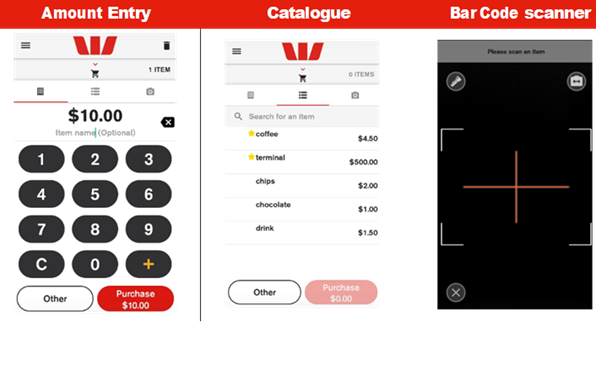
The start screen for a purchase supports three views. You can switch between these views by selecting the icons on the screen: Amount Entry, Catalogue, Bar Code Scanner.
LitePOS has a key feature that makes taking card payments quicker and more accurate than keying in the amount – the in-built item catalogue. Before taking payment for purchases, items need to be added to the catalogue.
You need to complete the steps below to add an item to the catalogue.
- Select the menu icon at the top left.
- Select Items.
- To add items or make changes to existing items in the catalogue, do one of the following:
- Select + to add an item.
- Select the item name to edit the item.
Refer to the table below to enter or edit the item information.
| Item | Description | Optional/Mandatory |
|---|---|---|
| Photo | Add a photo of the item Note: To add a photo for an item the Camera and Storage permissions must be granted for the device. |
Optional |
| Name | Name of the item, e.g. coffee | Mandatory |
| Item Description | A description of the item, e.g. large | Optional |
| UPC | Universal product code (Barcode) Tap the red icon to scan the code. If you are having trouble viewing a barcode, tap the flashlight icon. |
Optional |
| SKU | Stock keeping unit | Optional |
| Price | The price of the item | Optional - defaults to zero |
| Favourite | Highlights item with a star to stand out | Optional |
4. Select Save on the top right corner.
Deleting an Item
- Select the menu icon at top left.
- Select Items.
- Select the item to be deleted.
- Select Delete Item. A confirmation message will display.
- Tap OK to delete the item.
Enter each purchased item by using either:
- Amount Entry > calculator
- Catalogue Selection > items
- Barcode Scan > scanner
You can complete the purchase in 3 ways:
Adding items - Amount Entry
Complete the below steps to add an item to the shopping cart using Amount Entry.
- Ensure the calculator icon is selected.
- Use the touch screen to enter the purchase amount. (e.g. $1500 = 150000). At this point, an item name can be added by selecting the item name field.
Note: If an item name hasn’t been added, the item will be displayed as ‘Custom Item’ in the shopping cart. - Add your item to the cart by selecting +. If no other items are to be added, select Purchase then follow the prompts to take payment.
Adding items – Catalogue Selection
Complete the below steps to add an item to the shopping cart using Catalogue Selection.
- Ensure the catalogue icon is selected.
- Tap each item to add to the shopping cart.
Once all items have been added, select Purchase then follow the prompts to take payment.
Adding items – Barcode Scan
Complete the below steps to add an item to the shopping cart using Barcode Scan.
- Ensure the camera icon
 is selected.
 - Position the camera over the barcode.
- If successful, the terminal will beep, and the item added to the shopping cart.
Note: If the item is not in the catalogue, an error will display.
Settlement totals
Settlement is the process that’s completed so you can be paid for your transactions. At the time of settlement, a settlement cutover will be generated providing a detailed breakdown of the settlement.
The settlement cutover can either be emailed to your preferred email address, printed via the terminal printer or emailed and printed at the same time. If you wish for a cutover to not be generated, you can also choose to turn it off.
The terminal will automatically settle every day at your nominated auto settlement time. A default auto settlement time will be assigned if you haven’t chosen an auto settlement time.
The terminal must be turned on to complete an auto settlement. If your terminal can’t complete an auto settlement, we’ll conduct the settlement on your behalf.
If you wish to change your auto settlement time, contact the Merchant Helpdesk on: 1800 029 749 (available 24/7).
You may perform a manual settlement at any time throughout the day – before the auto settlement occurs. However, settlements cannot be processed between 9:30 pm and 11:00 pm (Sydney time).
- Select the menu icon located at the top left of the amount-entry screen.
- Select Settings.
- Select Account.
- Select Settlement.
- Select Settle Now, this will trigger the manual settlement.
- The settlement report will be displayed on the screen and printed.
Important: You can only perform a settlement once a day, before 9:30 pm (Sydney time). A settlement done after 11:00 pm will be processed as a settlement for the next day.
You may view or print any previous settlement report, for the last 14 days.
- Select the menu icon located at the top left of the amount-entry screen.
- Select Reports.
- Select Settlement History.
- Select the required date.
- The requested settlement will be displayed on the screen. Select Print, if required.
- Select the menu icon located at the top left of the amount-entry screen.
- Select Reports.
- Select Settlement Enquiry.
- The current settlement totals (since your last settlement) will be displayed on the screen. Select Print, if required.
- Select the menu icon located at the top left of the amount-entry screen.
- Select Settings.
- Select Account.
- Select Settlement.
- Select Auto Settlement Receipt Printing.
- Choose your preferred receipt option.
Note: If selecting Email or Email & Paper, you will be required to add your preferred email address.
Shift totals
Shift totals are accessed using the Shift Totals App. Shift totals are generally used to track transactions and tips during a specific time frame – for example, in a restaurant during the lunch shift or dinner shift. This function is independent to settlement totals.
The shift totals report displays the value of transactions, tips, and surcharge for the shift period. Shift totals can be viewed and printed multiple times per day with or without resetting them.
There is only a single shift at any one time – once a new shift has started, the previous shift gets closed.
- Swipe down from the top of the screen and select the App Launcher
- Select the Shift Totals App
- Select New shift.
- Select Yes to start a new shift or No to cancel.
Important: This screen is displayed if there’s a previous shift that started (as starting a new shift will clear any previous totals). - Select Yes to start a new shift or No to cancel.
- If you selected Yes to start a new shift, you’ll be offered the option to print a receipt for the shift totals. Select Yes to print a receipt (containing the current shift totals) or press No to skip this step.
- Select the menu icon located at the top left of the amount-entry screen.
- Select Reports
- Select Shift Totals report.
- A list of dates where a shift was logged will appear. Select the appropriate date.
- Select the desired shift - the report will contain the transaction, surcharge and tip totals.
- Select Print to print details of the shift.
Transaction reports
Transaction reports enable you to search for transactions, get the transaction history or reprint receipts for up to 14 days after a transaction is processed.
Important: A transaction may also be referred to as an Order.
- Select the menu icon located at the top left of the amount-entry screen.
- Select Transaction History.
- The transaction history will be displayed and organised by transaction date and time.
- You can scroll up and down the screen to locate the required transaction.
- Select the required transaction.
- Select RECEIPT.
- Select Merchant Copy or Customer Copy.
- Select Print or Email.
- Select the menu icon located at the top left of the amount-entry screen.
- Select Transaction History.
- The transaction history will be displayed and organised by transaction date and time.
- You can scroll up and down the screen to locate the required date.
- Select the printer icon next to the required date to view an expanded transaction history for that day.
- Select Print or Email if required.
You can search transactions using advanced search options.
- Select the menu icon located at the top left of the amount-entry screen.
- Select Search Transactions.
There are 3 ways a search can be performed.
Search bar.
- Enter the last 4 digits of the card, or the full STAN in the search bar. STAN is a six-digit ID number found on the receipt.
- Select View.
- All transactions that meet the search criteria will be displayed.
- Select the required transaction.
- Select RECEIPT.
- Select Merchant Copy or Customer Copy.
- Select Print or Email.
Card search.
- Select the card icon in the search bar.
- Tap, insert, or swipe the card to start the search.
- Select View.
- Select the required transaction.
- Select RECEIPT.
- Select Merchant Copy or Customer Copy.
- Select Print or Email.
Advanced search.
- Select Advanced Search.
- Search criteria includes amount, date range or transaction type and more.
- Tap in the required field.
- Use the onscreen keypad to enter the values.
- Repeat this for other search criteria, if required.
- Select Search
- Select the required transaction.
- Select RECEIPT.
- Select Merchant Copy or Customer Copy.
- Select Print or Email.
Electronic fall back
Electronic Fall Back (EFB) is the ability to continue performing transactions on the terminal, even when communication with the Bank for online approval has been lost or the card issuer is unavailable.
- EFB functionality is only available when enabled on the terminal, and only for allowed card types.
- Your Merchant Letter of Offer contains your debit and credit floor limits.
During EFB mode, transactions are processed and stored offline by the terminal. After communication has been restored, the terminal will forward the stored transactions to the Bank for processing. When processing in EFB mode, some differences apply to normal online processing, including:
- For credit card transactions that are over your credit card floor limit, you’ll be required to enter an authorisation number which you can get by calling 132415. Alternatively ask your customer for an alternative means of payment.
- Signature capture is required on all EFB transactions regardless of the account selection or whether a PIN was entered. The terminal will process the transaction in accordance with the EFB floor limits and other validation settings.
- Debit card transactions exceeding your debit card floor limit will be declined (when selecting Cheque or Savings). Ask your customer for an alternate means of payment.
- Please ensure the terminal remains turned ON during all EFB processing.
Remember: You must not ‘split’ a sale in order to avoid getting authorisation.
The Phone for Authorisation Required Continue? prompt will be displayed when communication has been lost, and the amount of the transaction is over the floor limit (credit cards only).
You must call the authorisation centre to get an authorisation number for the transaction.
You must complete the transaction on the terminal at the time of getting the authorisation number, and you must enter the authorisation number during the transaction and confirm the transaction is approved.
- If the Phone for Authorisation Required Continue? prompt is displayed, select Yes to continue the transaction or No to cancel the transaction.
- Enter the Cashier passcode and select Enter.
Note: to switch between the Manager and Cashier passcode, select the More options icon.
Important: The transaction will decline if Cancel is selected. - Phone 132 415 to get authorisation for the transaction. If approved, you’ll be provided with a 6-digit authorisation code.
- Tap in the Enter Auth Code box. A keyboard will appear at the bottom of the screen.
- Enter your code and select the green tick located bottom right of the keyboard.
- Select Enter.
- The terminal will display the transaction as approved offline.
Important: The cardholder will need to provide a signature to authorise the transaction. They’ll need to sign directly on the screen using their finger and will be prompted to return the terminal to you for verification. You’ll be prompted to approve or decline the signature. If the signature matches the one on the back of the card, select Yes, Approve or select No to cancel the transaction.
Note: If the cardholder requires to re-enter their signature, select Clear.
Glossary
| CCV Number (Card Check Value) or CVV Number (Card Verification Value) | An additional security feature used in transactions where the cardholder is not present (e.g. MOTO). |
| Charge Card | American Express, or JCB card. |
| Credit Card | Visa, Mastercard® or UnionPay International. |
| Debit Card | A card that gives the customer access to a Cheque or Savings account. The customer must be present when accessing these account types. |
| Electronic Fall Back (EFB) | The ability to continue performing transactions on the terminal when communication with the Bank’s host system has been lost. |
| Manager/Cashier Passcode | A Manager passcode is required for refunds and certain terminal functions. A Cashier passcode is required for staff and other authorised personnel to operate the device. Keep your passcodes secure, so only authorised personnel can access these functions. |
| Merchant ID | An 8-digit number issued to get an authorisation code for credit card transactions. This number is unique to your terminal, and can be found on any of the following:
|
| MOTO (Mail Order or Telephone Order) | Transactions initiated by mail or telephone are known as MOTO. This is only available for approved merchants and on credit cards. |
| PAN (Primary Account Number) | The unique payment card number (typically for Credit or Debit cards) identifies the issuer and the particular cardholder account. |
| PIN (Personal Identification Number) | A number used as a security access code for EFTPOS transactions. |
| RRN (Record Retrieval Number) | The record retrieval number is an invoice number found on your terminal receipt. |
Troubleshooting
Troubleshooting guide
Our troubleshooting guide could help you to understand why your EFTPOS machine is not working and walk you through the steps to get you up and running. Visit Troubleshooting guide for your EFTPOS terminal.