
Import ABA Payment Files, Payee and Payment Details Online
Save time making multiple payments. Import payment details, a spreadsheet of payees, or an ABA file of Direct Entry payments into Westpac Online Banking.
Import an ABA file
Set up the file in your accounting software, then follow their instructions to download it to your desktop. When asked for the Direct Entry service number, simply use 000000.
In Online Banking
- Go to Payments and File imports
- Select Import new file located on the right of the screen and under File type, select Direct Entry/Pay Anyone (ABA)
- Use the Choose file button to find the ABA file to import from your desktop, then select Upload
Tip 1: If the file has been uploaded successfully it will display the status Imported. If an Import failed status is displayed, select View details to find out why – so you can fix any problems using your accounting software before attempting another import. Common problems are explained later in this guide.
Tip 2: To make a payment using the ABA file, go to the Imported files list, select View details to check you have the right file, then select Confirm.
Import Pay Anyone payees
Create a spreadsheet with your payee’s details and save it as a CSV file.
In Online Banking
- Go to Payments, then select File Imports
- Select Import new file
- Select CSV as the file type, then select File contains payees only
- Select payee group (optional) and Payee type - Payee
- Select Choose File to browse and select a .csv file to upload
Tip: Match each column of your CSV file to the fields in Online Banking. Map the Payee BSB, Payee account number, Payee nickname (optional) and Payee account name then select Upload.
You'll see a File Imported message to confirm that your file has been uploaded. You can view your payees under View details.
Import BPAY® payees
Create a spreadsheet with your payee’s details and save it as a CSV file.
In Online Banking
- Go to Payments, then select File Imports
- Select Import new file
- Select CSV as the file type, then select File contains payees only
- Select payee group (optional) and Payee type – BPAY®
- Select Choose File to browse and select a .csv file to upload
Tip: Match each column of your CSV file to the fields in Online Banking. Map the Payee BSB, Payee account number, Payee nickname and Payee account name then select Upload.
You'll see a File Imported message to confirm that your file has been uploaded. You can view your payees under View details.
Import Pay Anyone payment file
In Online Banking
- Go to Payments and File Imports
- Select Import new file
- Select CSV as the file type, then select File contains payment information. Select Choose File to browse and select a .CSV file to upload
- Under Payment details, select Payment method – Pay Anyone and add the From account, Description (optional), Payer name and Payment date (up to two years in advance)
- In the Mapping rules section, map each column of your .CSV file to the fields required. Include the Payee BSB, Payee Account number, Payee Account name, Payment description (optional), Payment amount and Nickname (optional), then select Upload
- Select View details to review the payment
Import BPAY payment file
In Online Banking
- Go to Payments and File Imports
- Select Import new file
- Select CSV as the file type, then select File contains payment information
- Select Choose File to browse and select a .csv file to upload
- Under Payment details, select the Payment method – BPAY® and add the From account, Description (optional), and Payment date (up to two years in advance)
- In the Mapping rules section, map each column of your .CSV file to the fields required. Include the payee’s Biller code, Customer reference number, Payment amount and Payee Nickname (optional), then select Upload
- Select View details to review the payment
Frequently asked questions
- Your ABA file is labelled with a ‘File description’ and this is what appears on a payee’s statement when a payment is made (e.g. ‘Company Salary’). Make sure when you set the file up it is labelled with the correct file description.
- Some accounting software packages won’t let you change the file description before downloading it to your desktop, and file descriptions cannot be changed once a file is imported into Online Banking.
If your Online Banking is set up to have more than one Approver, each ABA file import will need to be approved by the required number of Approvers before payments can be made.
These other Approvers will need to:
- Sign into Online Banking on a desktop
- Select the Approval button near the Sign Out button
- Select the Payments tab, where they will see the import file pending approval.
First, get to know the file structure:
- Each ABA file features a header row, with information about the payment such as WBC (which indicates Westpac), who the payment is coming from (i.e. you), the file description and the payment date.
- Under the header, you’ll see the details of each payment you’re making including who you are paying, their account, the amount, and the ‘trace account’ (the account the money is to be paid from). You can only nominate one trace account per ABA file.
- The last row is a summary featuring the number of payments you are processing and the sum of the payments.
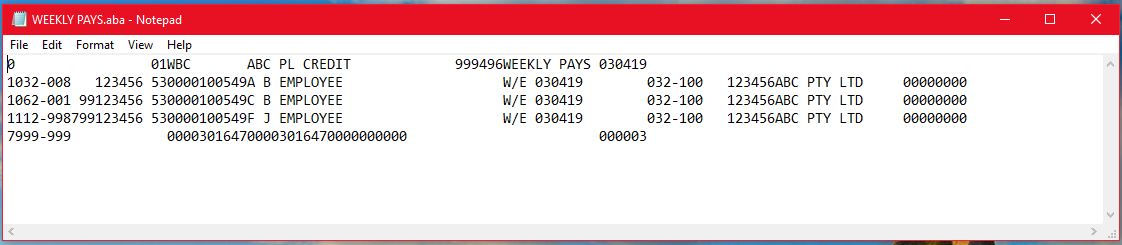
Things to look out for:
- BSBs must be 3 plus 3 numerals with a hyphen: 000-000
- Account numbers should be 9 numerals
- Payment dates need to be in the format DDMMYY
- Payment dates cannot be more than 7 days in the past
- Summary lines must add up to the payments listed.
- Standard payment transaction ABA files are limited to 500 payments. If you wish to make more payments (or import an ABA file for credit transactions), please speak to your Relationship Manager and ask for a ‘Direct Entry facility’.
- ABA file payments can be future dated by up to 24 months.
You can import the following payee types into Online Banking:
- BSB and account number
- BPAY biller code and customer reference number.
Your payees can only be imported as a csv file. There is a maximum import limit of 400 payees at any one time.
Import Pay Anyone payees
Using Microsoft Excel, create a spreadsheet with your payee’s details:
- BSB
- Account number
- Account name
- Nickname (optional).
Make sure you have formatted your BSB and account numbers as text, rather than general accounting or other Excel formats. Headings are not required.
Import BPAY payees
Using Microsoft Excel, create a spreadsheet with your payee’s details:
- Biller code
- Customer reference number
- Nickname (optional).
Make sure you have formatted your Biller code and customer reference numbers as text, rather than general accounting or other Excel formats – and no headings are required.
The Import file feature Online Banking allows you to import a csv file, which consists of multiple payment details created using your accounting software.
Once the file is imported, the payments will be populated so that you can easily process them as part of a multiple Pay Anyone or BPAY® transfer with one debit from your chosen business account. This can be used to make payments to employees and suppliers.
Pay Anyone (BSB and account numbers) and BPAY® (biller codes and customer reference numbers) payments should be imported as separate files. Files should be saved as a .CSV.
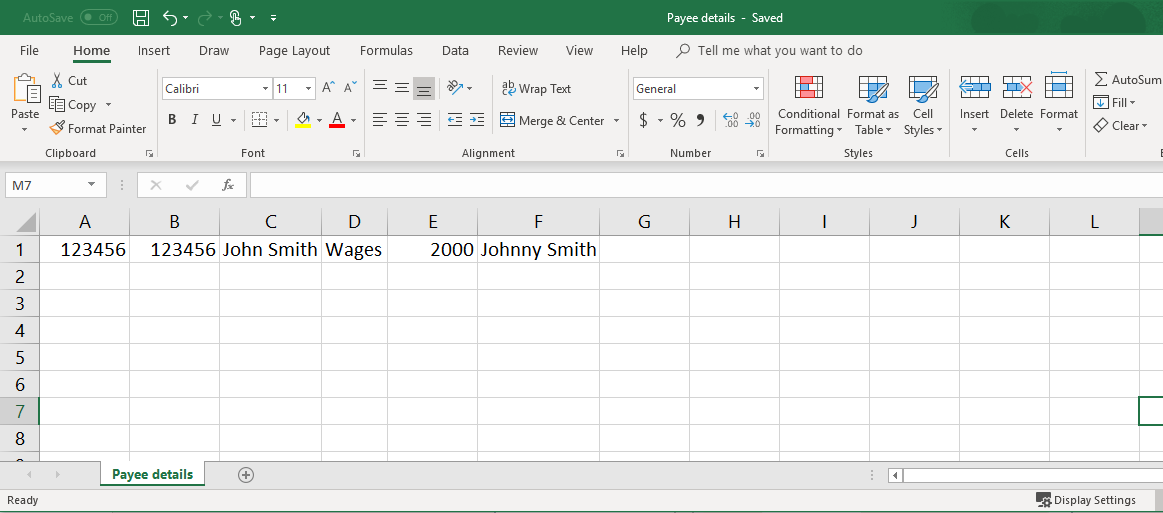
Import Pay Anyone payment file
Your file needs to include the following details (without any special characters):
- Payee BSB
- Payee Account number
- Payee Account name
- Payment description
- Payment amount
- Nickname (optional).
Example of .csv file for Pay Anyone payees
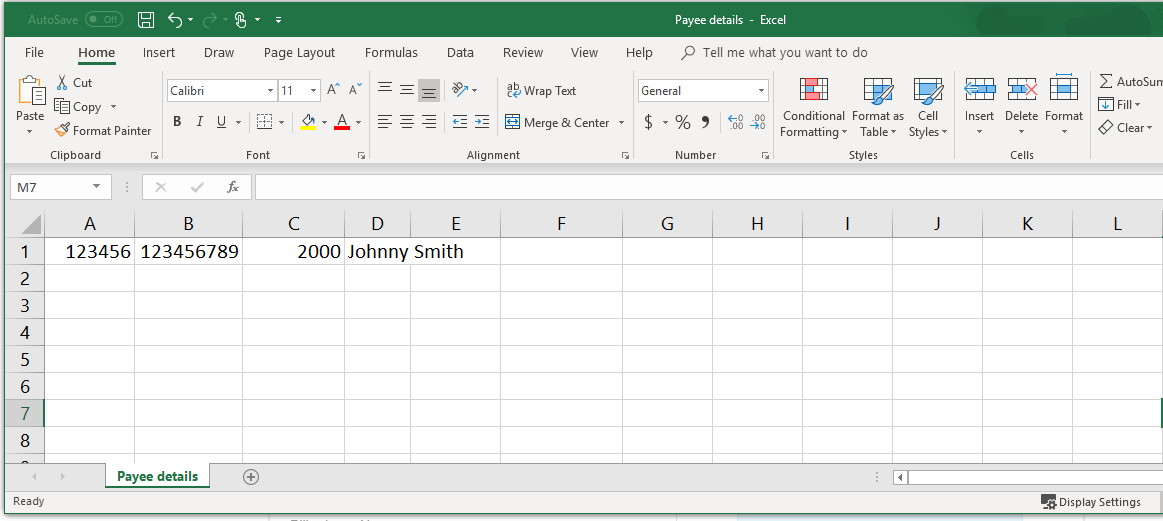
Import a BPAY® payment file
Your file needs to include the following details (without any special characters):
- Payee’s Biller code
- Customer reference number
- Amount
- Nickname (optional)
Example of .csv file for BPAY® payees.
Things you should know
Read the Westpac Online Banking Terms and Conditions (PDF 713KB) at westpac.com.au before making a decision and consider whether the product is right for you.
BPAY® registered to BPAY Pty Ltd ABN 69 079 137 518.